In this tutorial you'll learn:
- How to start a project
- How to display text using form printing, and text boxes
- How to use the toolbox
In my first tutorial, we'll be doing the classic Hello World! example. This example is a common tutorial which acts as a starting point. It requires very little coding and lets you see your output on screen almost immediately. It's also strangely satisfying to get those two little words up on screen. After you have done so you can even play around and make up silly things.
Your First Project
Start by loading up Visual Basic 6.0. You'll find the shortcut in your programs list or on your desktop (if you decided to put one there). When it has loaded, you'll should see this lovely little screen which gives you options which defines what type of program you want to make.
Simply select "Standard EXE". This is the most common type of application that is developed in Visual Basic 6.0. As you can see by the other options, it does plenty of others as well.
I have yet to use any of the other options, and I suppose it all depends on what you are actually coding.
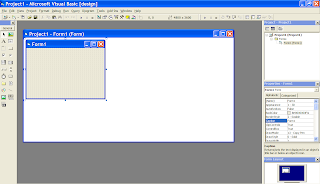
The user interface will then fully appear and you will be presented with a project in the form of, well... a form! This is shown in the screenshot below.
On the left of the main screen you have the toolbox, which I'll go into in a moment. In the centre you have your main design interface where you control your forms and do your coding in the code box. On the right you have your project browser, which shows all of the main forms in your project as well as any additional modules. (Modules are just self-contained pieces of code that aren't linked to a form.) On top you have your toolbar which contains the common options plus very important tools you will need later on.
 The Toolbox
The toolbox is your design hub. Everything you place on your forms comes from the toolbox. Hovering over each item will display a tooltip of what each one is. For example, the capital A is a label. This is like your standard text box in Word, or a label in Access.
The button to the right of that is the text box, which gives a box where users of your program can enter text.
The button underneath the text box button is for command buttons. Command buttons can be used for all sorts of things, like changing forms, performing functions, or displaying data. When users click on command buttons, an event is triggered that sets off the code you have placed behind the command button. In most VB6.0 applications, the command button is one of the most commonly used and vital form features.
There are many other tools in the toolbox, but for now we only need these three.
Printing Text Onto Forms
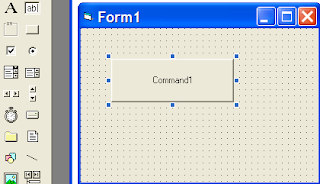 To begin, we'll explore Visual Basic's print statement. The print statement can be used to simply print a piece of text to a form. First of all simply click the command button on the toolbox. Hovering over the form, your cursor will change to a crosshair. Click and drag out a command button to an appropriate size.
Note that it doesn't matter about what the button says at the moment. Double click it to view the code box.
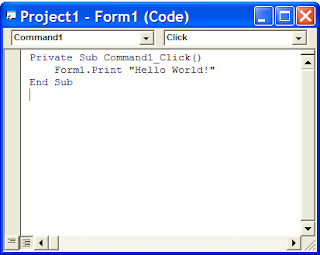 Of course, you'll see this box a lot. This is where you type your code. For this example, type in the code shown underneath Private Sub Command1_Click().
Form1.Print "Hello World!"
Notice I have used the tab key to indent the piece of code. Indenting your code and creating a layout is very important, as it makes your code easier to read. It's horrendous looking through chunks of code with no indention or breaking up to find something when you have a very large program.
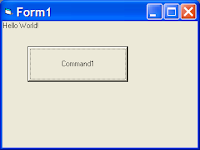 When you have done this, press the play button on the top toolbar to enter debugging mode. You can also press F5 on your keyboard. When debugging large programs, it can be useful to use the "Start with full compile" method (Ctrl + F5). This compiles the full program before running it, which helps identify any errors that are in the code.
When the program runs, click the command button that you placed on the form earlier. The program then should print the text "Hello World!" at the top of the form, as shown here.
You have now learned how to use the print statement to print text on a form.
Using Text Boxes
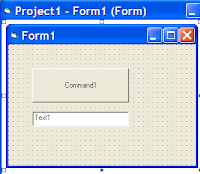 You can do the same thing using text boxes. To continue, stop your program from running by pressing the stop button. Now, find the text box button on the toolbox. It's the one to the right of the capital "A". Do the same as before, dragging out your text box to a suitable size, like in the screenshot.
Now, as you'll see the text box currently reads "Text1". We want the text box to be blank however. To do this we must use the Properties panel on the right hand side.
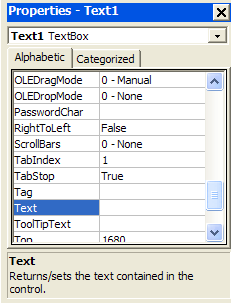 This panel is very useful for working with any sort of item on your form. You should explore it yourself for when you want to do something different.
For now, click the text box and scroll down the properties until you find "Text" and delete "Text1" from it. This will make the text box blank. It's important to note that this is the main difference between text boxes and labels. To clear a label it is the Caption property you want. You can also use this property on command buttons to change what they say. You can try this now if you want.
Now the text box is blank we can work on putting the code behind the command button. The code here involves using your first data type, the string.
There are many different data types, but the most commonly used ones are string (for holding text) and integer (for holding numbers).
With the code editor open, delete "Form1.Print "Hello World!". Now type "Dim Text As String". This method is called declaring a variable. "Text" is your variable identifier. A key point to note is to always use identifiers that you or anyone else looking at your code can understand. Here we are just displaying some text, so "Text" is fine.
On the next line, type "Text = Text1.Text". Here we are storing whatever is in the text box in the variable Text as a string. Reading from right to left, the equals sign means store the right side in the left side.
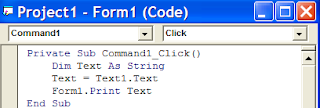 Finally type "Form1.Print Text". This is exactly the same as what we done before except now you're taking text from a text box.
Check that your code is the same as mine and press F5.
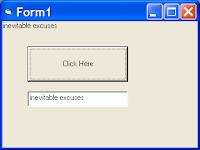 Type anything into the text box and click the command button. This should print what you entered into the text box onto the form. For example I entered "inevitable excuses".
You have now learned how to use text boxes and command buttons to perform operations.
And that's it for this tutorial! We have covered a couple of things you can play around with.
In the text tutorial I will aim to expand on this tutorial with input boxes and message boxes.



No comments:
Post a Comment